Many of our most common food crops such as tomatoes, cucumbers and a wide variety of other fruits require pollinators
Read moreRecipe - Summer BBQ
Enjoy the summer weather by preparing these deliciousKorean Short Ribs for your family.
Read moreHand Sewing 101 - Part 2

By Desmond Miller
In this issue, we’ll learn some essential hand sewing stitches that will help prepare for future projects. Unless otherwise indicated, always tie a knot when beginning and ending a row of stitches. For right-handed sewers, most stitches move from right to left. It will be the opposite for left-handed sewers. In our last issue we showed you how to sew a button, for more details visit
www.downsviewadvocate.ca
Basic Stitches
Tools required: Sewing needle, thread
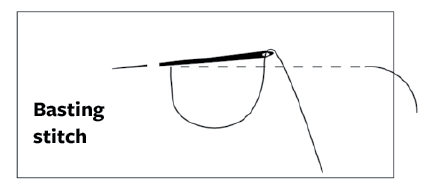
Basting or ‘running’ stitch
Usually used to temporarily hold together a seam, or two pieces of fabric, in order to apply more permanent stitches. NB In this case it is unnecessary to tie a knot at the beginning and end of the stitch
1. Guide the needle in an out of the fabric from right side to wrong side and back to right side. Leave a 1-2 inches of excess thread (a ‘tail’) on the right side of the fabric.
2. Continue with even stitches (between 1/4 inch - 5/8 inch) until the end of the seam is reached.
3. Trim thread leaving a 1-2 inch tail.
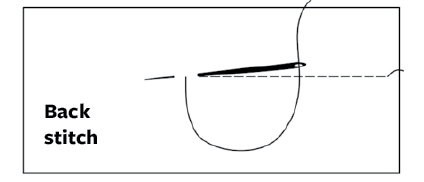
Back stitch
Used to make permanent stitches that hold a seam or two pieces of fabric together.
1. Guide the needle through the fabric, moving forward 1/4 inch and then back 1/8 inch.
2. Continue with even stitches, making the back stitch one hair away from, or in the same hole as, the previous stitch.
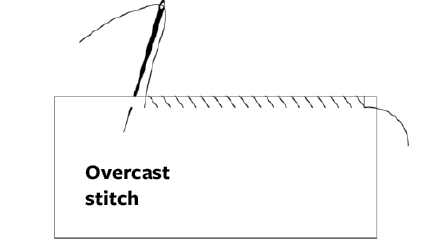
Overcast stitch
used to protect the raw edge of fabric or a seam from unraveling.
1. Starting from the wrong side of the fabric, guide the needle to the right side 1/4 inch away from the fabric edge.
2. Take the next stitch by guiding the needle from wrong side to right side, 1/4 inch away from the fabric edge and 1/4 inch ahead of the last stitch.
-
-
Continue until end of seam.
-